If you have opted for one of the "freebie" sites with easy-Web-page tools to setup your Web site, this article is not for you. If you have a free Web site but want to write your pages from scratch, skip the first sections on getting a domain name and a web host.
Want your own domain name? Want a "real" Web host and not a "free" site? Don't want your site to look like yet-another-AOL homepage? Don't want pop-ups and banner ads annoying your visitors? This tutorial's written for you.
BEGINNER CERTIFIED
Who better to act as guinea pig when I first wrote this article in 2002 than Sam, my fearless, Web surfing, instant-messaging then-teenager, who didn't know what Notepad was, who had to learn how to use an FTP Client and who didn't know any HTML (hyper text markup language – what Web browsers translate into the Web page on your screen). Thank you, Sam. If Sam can do it, you can too.IN THE BEGINNING
First, register your domain name.No, first decide on your domain name.
Christopher Heng at thesitewizard.com has a useful article titled, Tips on Choosing a Good Domain Name. Check if a given domain name is available with GoDaddy.com. You may find that your first-choice name has already been taken. Try again (and again and again).
Once you've chosen your domain name, there are many domain-name registration services available for a wide range of prices.
I've used GoDaddy.com to register a dozen or more domains. GoDaddy is professional, prompt and cheap: about $20 for a two-year registration, depending on whether GoDaddy is running any sales at the time. Domain registration takes a couple days to complete.
Sign up for Web hosting while you're waiting for your domain registration. GoDaddy can host or you can signup with one of the hundreds of other Web hosts. CNET lists many alternatives
I use GoDaddy to host my Web sites. GoDaddy's barebones hosting costs $4.50/mo if you buy two-years' worth at a time or $4.99/mo if you buy three-months' worth at a time. Adding features can cost up to $15/mo. The barebones hosting has worked well for me.
If, as I did, you register a domain name with GoDaddy but host the domain elsewhere, log onto GoDaddy and modify your GoDaddy Nameserver information to point to your host machines. Your "welcome" letter from GoDaddy explains how to do this. Other Domain Registrars operate in a similar manner.
Pop your domain name into your Web browser. If your hosting and nameservers are setup correctly, you will pull up your barebones site. Now what?
FTP – WHAT?
FTP, file transfer protocol, is the simplest way to transfer files over the Internet. Use an FTP Client to transfer your Web files from your machine to your Web site. File Transfer Planet provides a brief FTP tutorial.Learn how to use your FTP Client. Log onto your Web site. Navigate through the site. Create a directory off your main page where you'll practice HTML. We'll call it "stash."
I am on a Windows machine which allows you to set up a network location easily. Go do your directory. Right-click in the blank area titled Network Location. Select Add Network Location from the dropdown menu. A Windows wizard walks you through the process of setting up an FTP location for your domain.
TRIAL RUN
Edit your HTML pages on your hard drive before uploading to the Web site, even if you are able to edit directly on the site. If your hosting company goes sneakers up or the site gets hacked, you will have a pristine copy of the latest version on your hard drive and can recover without breaking a sweat.To keep transfers easy, set up a directory structure on your machine that mimics your Web site structure.
You could, for example, have a directory structure that looks like this:
  yourdomain
    links
    mp3s
    work
    stash
    graphics
After your directories are setup on your hard drive, go to http://www.towse.com/stash/practice.htm and save a copy of practice.htm to the /stash folder on your hard drive. To do this, use ctrl-S to save the file.
Practice moving files to your Web site. FTP the practice.htm file from the /stash directory on your local system to your remote Web site's /stash directory. If you've FTP'd practice.htm successfully to your Web site, you will find it in http://[yourdomain.com]/stash/practice.htm
BEGINNING HTML
Too often the easy-as-pie HTML tools a novice Web designer gets with a "here's your free Web page" service create cluttered, incomprehensible HTML code. The novice never learns how HTML works and doesn't know how to edit HTML to make simple changes.Use a simple text editor (I use MS Notepad) to create HTML files when you're just beginning, rather than the beginner Web editors available. Later when you're ready for more complex design, decide whether to get gutsy or to use Web tools to produce your HTML code.
INDEX.HTM
Every (and I mean EVERY) directory on your Web site should have an index.htm file. If a directory doesn't contain index.htm, a snoop may be able to read all files in that directory. This tutorial teaches HTML by helping you create an index.htm file for your /stash directory on your Web site.In your /stash folder on your hard drive, make a copy of the practice.htm file. Rename the copy index.htm.
Open index.htm using your text editor. If you use MS Notepad, simply drag and drop index.htm into Notepad.
Take a look at the simple HTML in index.htm. Here are a few basic design factoids to remember:
1] HTML uses tags to tell Web browsers how to layout and display the contents of Web pages. open <tag> and close </tag> tags describe what happens in-between.
2] If multiple tags affect a section, close the tags in reverse order: <u><strong><em> here-we-are </em></strong></u>
(This sequence will underline your text, bold it, and italicize it.)
3] Web browsers ignore lines beginning with <!-- and ending with -->. To add internal notes, use
<!-- your comment here -->
BASIC LAYOUT
Every HTML file has four master tag sets.The <html></html> tags tell the Web browser that the file is an HTML file. <html> is the first line of your file. </html> is the last.
The <head></head> tags begin and end the header – descriptive information at the beginning of the file. You need "title" information in the header. You can also have META tags. Wait until you're comfortable with simple Web design before adding META tags. When you're ready, read this article from Search Engine Watch. (Search Engine Watch is a very useful site.)
The "title," surrounded by <title></title> tags, is the first line of header information. The title information for practice.htm is <title>practice.htm</title>.
The tags follow the information and surround the bulk of the Web page layout. To summarize, your basic layout looks like
<html>
      <head>
            <title>
                 title stuff here
            </title>
            META tags, if used
      </head>
      <body>
             page layout details here
      </body>
</html>
Most < > tags require a complementary close </ > tag.
Close all tags that need closing or you may have mysterious problems with your page: it may not display at all!
BACKGROUND & COLORS
Most people want to jazz up their plain white background with colors or patterns.The command for a patterned background is
<body background="the URL for the pattern you've chosen">
Absolute Background Textures Archive provides some free backgrounds or you can search for
free background jpgs
free web site backgrounds
Find a "free" background you like and save it (right-click and save) to your /stash folder on your hard drive. I chose a background called featherclouds1.
FTP the new background to your Web site's /stash directory. Edit index.htm on your hard drive to reference the new background name.
<body background="http://www.towse.com/stash/featherclouds1.gif">
Save the changes. Double-click on index.htm. Your Web browser will display your local copy and you can see how the changes look. featherclouds1.gif looked interesting but is overwhelming when it's rendered over an entire page. I went back to whitemar.gif instead, then repeated the process.
Note: Do not "lift" backgrounds and graphics from sites unless the background is freely available or you ask the site for permission. Not only text but also Web art, backgrounds, and images are covered by copyright law.
If you'd rather have a solid background than a pattern or picture, use <body color="######">
To find the six digit codes for colors, use the Visibone site.
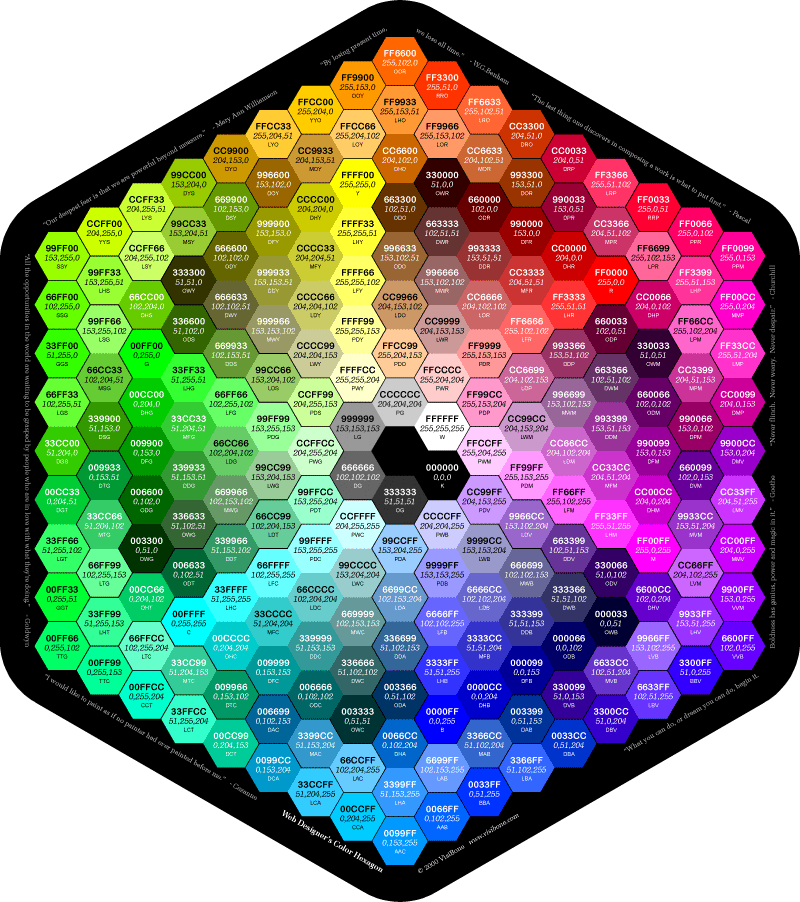
<body color="ccff66">, for example, specifies a bright chartreuse background.
Put all <body> specifications - background pattern/color, text and link colors – in a single <body> tag.
<body background="[URL for your background]" text="000000" link="cc66ff" vlink="339966" alink="0000ff">
"text" specifies text color. Link color specifications include link (hyperlinks), vlink" (visited hyperlinks) and alink ("active" hyperlinks).
LINES, TEXT and SPACING
Let's move into the <body> section of index.htm.<br /><center><strong>Practice </strong></center>
<hr align=center width=50%>
<br /> indicates a line break. Make sure there's a space between the br and the backslash. Text wraps automatically. If your visitor uses a different sized font, text wraps to fit.
If you want to force a line break or want multiple blank lines between two lines of text, toss in as many <br /><br /><br /><br /> as needed.
The two lines above would give the following result:
The <center> tag centers whatever follows up until the </center> tag.
<strong> specifies "strong" lettering, which is usually, but not always, rendered "bold." Close with </strong>
<em></em> specifies "emphasis", which is usually rendered italicized, between the two tags.
<strong></strong> and <em></em> specify "bold" and "italics."
Please (please, please, please) avoid <blink></blink>,
which does what you probably expect it would. Try it, if you must, but please don't use it on your Web site.
To set or change font size use <font size=n>, where n ranges from 1-7, increasing as the value increases.
<font size=-2> reduces font size two steps from the default font size.
Edit index.htm as follows and see what happens:
The five boxing <font size=5>wizards</font> <font size=7>jump</font> <font=-1>quickly</font>.
Your result should look like this:
The five boxing wizards jump quickly.
Another way to change font size is to use headers (not to be confused with <head></head>). Headers come in different sizes.
Headers appear as bold type on a separate line.
<h1> is the largest header font. <h6> is the smallest.
The header tag must be closed: </h3>. Header tags can specify where the header appears (left, right, center). Add this line and see what happens.
<h1 align=left> H1 with align=left.</h1>
H1 with align=left.
Add the text "Hello, world." Use text tags and see how tags affect the look of the text. Combine font size changes with bolding and italics, but don't go overboard.You can also (gingerly!) specify a font type other than the Times New Roman default for your text. I say "gingerly" because if visitors don't have the specified font on their computers, their default fonts are used and your Web page won't display the way you intended.
<font face="fontnamehere">
Some popular font names are Times New Roman, Arial, Impact, Verdana and Comic Sans MS. Specify some fonts.
<font face="Verdana"> Check whether you like Verdana, for example, better than Times New Roman.</font>
Check whether you like Verdana, for example, better than Times New Roman.
<font face="Impact"> Or maybe you like Impact, for example. </font>
Or maybe you like Impact, for example.
To change text color for a given section from the specifications in the <body> tag, use <font color="######">. The color codes are those already used for text, links and background color.
Multiple font settings can be set with one command <font size=n color=xxyyzz face="Verdana">. </font> resets values to defaults.
<hr>, like <br />, doesn't "close." <hr> indicates a "horizontal rule," like the line at the top of index.htm. <hr align=center width=50%> tells the Web browser to create a horizontal line half the width of the text space and center it. Alignment can be left, center or right.
BARBED WIRE & GRAPHICS
What if you don't want that boring old horizontal rule? Instead you want BARBED WIRE!Check out the various lines available online. cq-pan.cqu.edu.au has a variety.
Save the barbed wire image. (With Microsoft, right-click the image and choose save-image-as and put the image on your hard drive.) FTP the image to your Web site /stash.
Substitute <img src="http://www.[yourdomain.com]/stash/barbed_w.gif"> for <hr align=center width=50%>

Uh-oh. The image isn't centered under the title. Center the barbed wire by using <center> before and </center> after.
<center><img src="http://www.[yourdomain.com]/stash/barbed_w.gif"></center>
Free graphic images are available in many places on the Web.
Novice Web designers tend to include too much of a good thing. Keep your site simple. Your site will load quicker and your visitors will appreciate it.
PICTURES!
Adding a picture is similar to adding the barbed wire graphic.Take the copy of your picture/photograph that is in the /stash directory on your hard drive and FTP it (.jpg, .gif) to the /stash directory on your site.
Add a line of code: <img src="URL here"> e.g.<img src="http://www.towse.com/photos/sjt.jpg">

Is the image too big? Either use your picture editing software to reduce the size (and FTP the reduced-size image to your site) or adjust the height by specifying the width and height: <img src="URL here" width=180 height=230>. The larger the image, the longer it will take to load. Loading an image that is the size that you need is best.
Text aligns along the bottom of the image. If you add enough text, it wraps around under the image. Try playing with image alignment. The choices are top, middle, bottom, left and right. What happens when you have loads of text? How does it wrap?
Some of your visitors browse with graphics turned off for quicker loading times. Provide them with a label so they'll know what they're missing.
<img src="http://www.towse.com/photos/dft-1942.jpg" width=160 height=210 align=top alt="DFTowse-1942" />
 Here's where text would go with align=top.
HOT LINKS and THUMBNAILS
Back when the Web was the new-new thing, hot links, which allowed us to surf for hours from site to site, were the red-hottest thing about Web pages.Hot links use anchor tags <a> and </a>.
<a href="your URL here"> description or title here</a>
e.g.
And here's a practice link to <a href=http://www.towse.com> towse.com</a> for this practice page.
And here's a practice link to towse.com for this practice page.
Another use for anchor tags is thumbnails. Loading large images puts a heavy load on a ‘net connection and eats up time if your visitor has a slow connection. If you want to have large pictures or loads of pictures on your site, consider using thumbnails (smaller images) and anchor tags. First, FTP your pictures (both large and thumbnail) to your site.
You can implement thumbnails in two different ways:
[1] Make a much smaller image using your picture editing software. FTP this image to your site and give it a name like bigpic_tiny.jpg.
<a href="[yourdomain]/stash/bigpic.jpg"><img src=" [yourdomain]/stash/bigpic_tiny.jpg" alt="big picture here"></a>
The <a href="URLbig"> anchor tag provides a link to the picture. The <img src="URLtiny" alt="text"> tag (used in place of the "description or title here" hotlink we had before) displays the smaller image. A click on the smaller image hotlinks to the picture. Remember to close the anchor tag.

[2] Alternatively, size the picture smaller than it is and link the reduced image to the full-sized picture.
<a href="[yourdomain]/stash/bigpic.jpg"><img src="[yourdomain]/stash/bigpic.jpg" alt="big picture here" width=100 height=185></a>
Click on the photo to bring up the large photo.
The width and height values specify the dimensions of the reduced-size image on the Web page. Again, the loading time is less, if a thumbnail is used instead of using width/height specifications to modify the size of the original on the fly.
HELLO, WORLD!
You now have an index.htm page on your Web site with lines, graphics, lettering of various sizes, colors and fonts, hotlinks to other sites and images. It may, or may not, look a bit like mine.You know enough HTML to build simple Web pages from scratch. Be sure to FTP your completed index.htm page to your Web site /stash and create a different index.htm page for your home page.
There are a number of good online HTML tutorials. When you are comfortable with the baby steps I've outlined, cruise the helpful information at the following sites:
WebMonkey's HTML Cheatsheet
WebMonkey is an incredible resource.
Kevin Werbach's Barebones Guide to HTML
Ron F Woolley's So you want to create your first HTML pages?
Dave Kristula's HTML: an Interactive Tutorial for Beginners
Paul Lutus's HTML for the Conceptually Challenged
John C. Gilson's HTML Tutorials (the first 21 are free!)
When you are comfortable with basic HTML, move on to CSS (Cascading Style Sheets) and all such things nifty. Be sure not to design your entire Web site using simple HTML when you will want to incorporate CSS in the final product.
Other Browsers
Your new page may look fine on the browser you use. You did, after all, tweak it to look good. Other browsers may, and often do, display your page differently. If you want to make sure your page displays on users' browsers the way you are hoping, use http://browsershots.org or a similar tool. Specify which browsers you're interested in seeing your page on and BrowserShots pulls up your page on those browsers and takes a screen shot. You may find some surprises!The service is free but may take a while as you wait in queue with other users.
No Dancing Raisins!
Check out Please, no dancing raisins for some (ahem) outspoken opinions (ahem) on what is and is not "good" Web design.You may also enjoy Vincent Flanders' Web Pages That Suck, or "how to learn good Web design by looking at bad Web design."
About the Author
Sal Towse spends her waking hours writing, surfing the Net (research!), loitering in Usenet newsgroups, and goofing around on Twitter and Facebook when she isn't sitting crosslegged on the deck watching events unfold from her perch above the San Francisco Bay, exploring the nooks and crannies of the City or curled up with a good book. You can find her at http://www.towse.com.
Have comments about this article?
© Reproduction or other use without permission -- don't.
You are here:http://www.towse.com/articles/simplewebsite.htm
A version of this article was originally published September 2002 in Computer Bits
Links checked Apr 2009. This page was last updated on 2009-04-26.